|
When he first agreed to take the engine on Wally asked me to do
him a favour. I thought that he was going to ask me to do something complicated
and clever, but in fact it was very straightforward. He simply asked me to fill
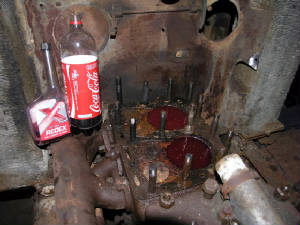
the cylinder bores (once I had cleared out the water and the worst of the gunge) with Coca-cola and Redex; the idea is that
you fill the bores to within half an inch of the brim with coke, then float Redex on the top (I think I actually drunk one
of those once upon a time in a transport café on the Yorkshire coast). The coke
eats through the gunge and rust and seeps down past the piston rings into the sump, and it is followed down by the Redex which
coats the surfaces and ensures that things are kept, if not rust free, then at least softened up. Now I am all for bright ideas like this, after all what was there to loose? But Wally (who, as I say, is
incredibly experienced and something of a legend) swears by it so that is what I did.
Two and a half large bottles of full-fat coke and an industrial quantity of Redex later and the damaged heads went
back on ready to allow the mixture to make a start while I got on with other matters.
I am optimistic. Not only did I have Wally’s advice but I have seen
what coke does to teenagers. Surely the stuck pistons could not stay stuck for
long.
|
| It's the Real Thing - but will it help? |
Mack made much in their marketing of their design with the cooling
system at the back of the engine, stating that as no separate drive was required for the cooling fan then it was simpler,
more reliable and easier to maintain. With all due respect folks, that is not
quite true and the layout adds a whole deal of pain to taking the engine out as all the shrouds and other assemblies at the
rear need to be disconnected and shifted out of the way in order to clear the large fan assembly. But in reality this was
not too much of an issue as most of these parts needed to come off anyway. But
the net result was that rather than the engine coming out then the rest of the truck getting stripped, it worked the other
way around.
First, the cab came off (it is in a very bad way but it is good
enough for a pattern) followed by the timber windscreen frame (which needs work but is in much better shape than it should
be). Then fuel tank, steering column, scuttle shroud, scuttle and a variety of
control rods and levers. This then allowed the fan cowl underneath and the shrouding
at the front of the radiators to be removed. At the same time I carefully removed
the one remaining radiator shutter assembly, which will act as a pattern if I am unable to find replacements. Eventually after
what might not seem a lot, but in fact took me a number of weeks, I was in a position to lift off the radiator assembly and
lay it gently on a pallet, so that I could actually get to the engine and, more importantly, the mountings.
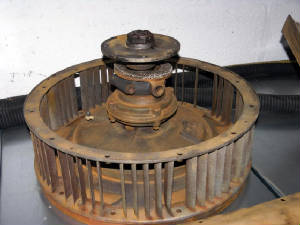
With the decks cleared it was obvious that, subject to getting
some big spanners out, that it was only a matter of time before the engine could be lifted free of the chassis. First to be removed was the propshaft, and I followed that up with the clutch and fan. This component took two of us to lift off, but with it out of the way both the clutch plate and the surfaces
were found to be in excellent condition. With the throttle linkage and fuel line
out of the way I could make a start on the engine mounting bolts. The rears,
though large and awkward to get at, were covered in a helpfully oily gunge and eventually came off (although turning the nuts
half a flat at a time was lengthy and boring). The fronts, having been exposed
to 80 years of the elements, were a different kettle of fish. I got one side
off, but the other side proved to be a complete pain. I eventually managed to
ease the mounting bracket just enough to get a hacksaw blade in to at least free the engine mount cross member by cutting
the bolts, but that will now need some work to sort it all out.
|
| The clutch and fan assembly - very heavy! |
With the front bumper removed, and the delicate and low mounted
carb taken off to avoid it getting damaged, the engine could be gently slid forward and out, and it was very pleasing indeed
to be able to get it secured safely into a post pallet ready for its trip to Wally’s workshop. I am waiting with baited breath for the verdict as to how good or bad it is and will follow this report
up with one dedicated to the engine alone, hopefully with pictures.
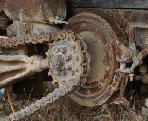
Moving the chassis about with the severely corroded rims and even
worse tyres was always going to be a challenges and so another key priority was to improve the state of wheels and tyres. Luckily the brakes could be freed off and the chains were not locked up, so it was
head scratching time again. Although common in the USA 24
inch rims are rare beasties on this side of the Atlantic, especially with the Budd type stud piloted
wheels that the Mack sits on. My first instinct was to investigate conversion
to 20 inch rims, which would allow me to choose from a variety of WW2 US-sourced Army truck types such as the Ward LaFrance
wreckers that exist here and in the rest of Europe.
It became obvious though that without serious modifications the
20in wheel would not have enough clearance to house the brake drums at the rear and the steering arm and track rod at the
front. What I did see though, purely by chance, was an advertisement for a load
of 24 inch, 10 stud wheels and tyres that had come of a Leyland Landtrain. The
odds of finding anything like this at the very time I was looking, and of them being any good, were long, but nevertheless
I drove down into deepest darkest Lincolnshire
one night and had a look. They seemed OK and although the actual stud hole and
shape was different, and the tyre sizes (and rim width) were a lot bigger than I needed, it looked as if I had a way of at
least getting the Mack onto some half decent wheels. I hired a transit van, drove
back and stuffed it with the tyre and wheel assemblies. My hunch proved a good
one, because although they are not quite right, they are good enough for now and I have a chassis on a set of decent wheels
and tyres for what I suspect is the first time in a long time.

|
| The chassis, on wheels at last, after a good wash |
Quite frankly, with the engine out and away and some wheels on
I should have turned my attention back to the Fire Engine. Indeed I had already
taken advantage of a fall in the price of metal and purchased a load of aluminium sheet to finish off the lockers and start
skinning the bodywork, but I was bitten by the Mack bug and as a result decided instead to press on a little further with
the old chain drive baby. I wanted to achieve a couple more things before switching
back to the Dodge.
The first was to sort out the dump body into those items I was
going to keep and those items that were beyond repair and would have to be re-made.
The former ended up quite a small pile and the latter quite a big one but that was not unexpected and the body had
worked hard and really suffered. The construction is very simple though and it
can be remade easily. I will keep as much as I can of the original fixtures and fittings however.
The other task was to remove the frame of the dump body (it was
still attached) and both steam clean and then blast clean the chassis with a view to checking it for its repair needs and
eventually getting some protective primer on it. Removing the dump frame was
surprisingly easy and only took a couple of hours. It was simply a case of removing
the giant pin on top of the hoist gear then taking the hinge blocks from the main pivot at the rear than lifting it clear
of the chassis, a total of 20 nuts and bolts, which, again against the odds, all came loose eventually. I then took the two heavy oak beams that had acted as the dump frame lands and I could see what sort of
shape the main chassis was in.
|
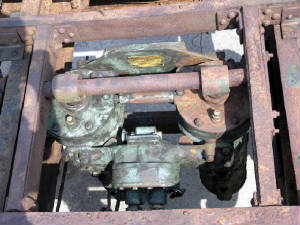
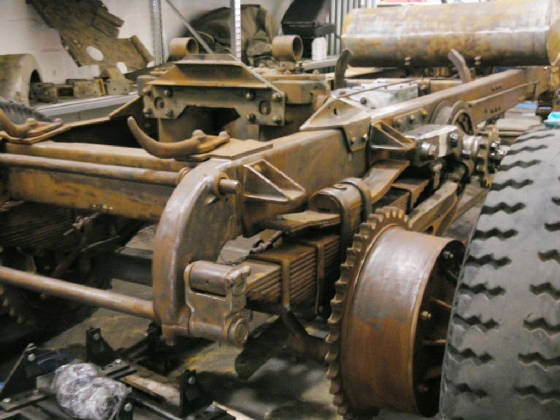
| Previously covered in 6 inches of grime and gunge, the dump gear is revealed |
Then the whole chassis was consigned to the art of the steam cleaner
and blaster. Years and years of grime, rock, dust, oil, grease and many other
layers were stripped back one by one and eventually, after hours of blasting, the true nature and state of the truck was revealed. The overall impression is a good one. Sure, there are one or two areas in need of
work, and there is plenty of evidence that this was a truck that had worked extremely hard for its living (including some
extensive repairs to both the chassis and the aluminium gearbox/jackshaft differential housing) but I am of the opinion that
these will stay as they are, with the minimum of fettling, as testament to the life that the old Mack led.

|
| The makers plate on the dump gear - "The Heil Hydro Hoist" |
One thing about the blasting is that it is never 100% effective
and there are inevitably bits that are missed or are impervious to the storm of abrasive material. This was no exception and the last week of so has seen me underneath, on top of, at the side of the chassis
with a scraper, grinder and wire brush getting to the parts that the blaster could or did not.
This is time well spent because not only does it prepare the chassis for future layers of paint, but it has also allowed
me to get intimately acquainted with the entire thing, spotting a spring clip that needs work here and a bracket that needs
work there and so on. There are still one or two parts that need removing prior
to rust treatment and primer (more about that another time) and a little welding still to do.
|
| The chassis - back to bare metal at last |
Another job that needed (and therefore got) my attention was the
4 towing hooks – two at the front and two at the rear. Goodness alone knows
what had been attached to them (something very big and powerful) but every one of them had been subjected to loads that had
all but straightened them all out. So a happy and productive couple of hours
were spent with a very large heating torch, some suitably sized piping as leverage for the big bends and a large hammer for
the finer adjustments. A little grinding and sanding (some of the hammer blows
were a bit enthusiastic) and we now have all the tow hooks more or less the right shape and pointing in the right direction.
Sand (or grit) blasting is a process that lays bare some of the
realities of a restoration that the restorer might not otherwise spot (perhaps until it is too late!) A good example is the radiator assembly of the Mack that, although it has come up very nicely, clearly
needs some tender loving care. The aluminium header tank show signs of severe
wastage in some areas and will need to be built back up. The fact that the wastage
is in the vicinity of the core plates (which are, I think, steel) suggests the effects of electrolytic action. The rest of the assembly will be checked carefully, and the first stage of that will be to strip the whole
assembly down into its constituent parts. One for the future I think.
|